How to Make a Pumpkin Puree
Many pumpkin recipes call for a puree, so it is quite useful to know how to make one…especially if you would like to stay away from that canned stuff! Fortunately, there are two standard methods that are simple and work well: boiling/steaming or roasting.
The point of making a puree is to soften the flesh, eliminate the water content and concentrate the flavor. The resulting puree highlights the naturally-occurring flavors and characteristics of the pumpkin – sometimes sweet and sometimes nutty…almost chestnut-like.
Both methods I present below work for any recipe. You will immediately notice the taste difference – an
Subscription Required For This Content
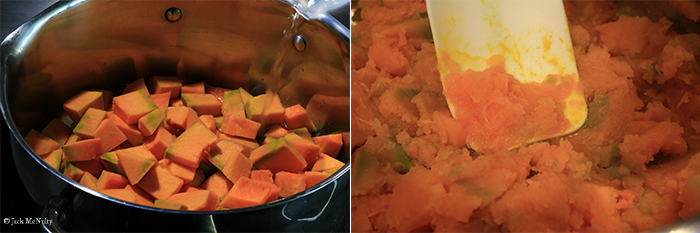
Many pumpkin recipes call for a puree, so it is quite useful to know how to make one…especially if you would like to stay away from that canned stuff! Fortunately, there are two standard methods that are simple and work well: boiling/steaming or roasting.
The point of making a puree is to soften the flesh, eliminate the water content and concentrate the flavor. The resulting puree highlights the naturally-occurring flavors and characteristics of the pumpkin – sometimes sweet and sometimes nutty…almost chestnut-like.
Both methods I present below work for any recipe. You will immediately notice the taste difference – an explosion of freshness rather than overly spiced and sweet versions coming from a can. The boiling/steaming method is a quick method that yields clean flavors. The roasting method takes a bit longer and produces a slight nuttiness. I tend to use the boiling/steaming method the most because of the time element, but I do adore the flavor of a roasted pumpkin puree.
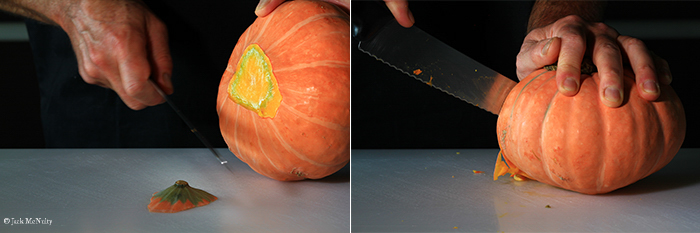
Preparing the Pumpkin: Pumpkins can be tricky to cut up into pieces. Their round shape and thick peels elevate the dangers of a knife slipping and ending up in your hand or finger – so caution is necessary. I encourage the use of a large bread knife to complete the task – along with plenty of patience and eye toward breaking down the pumpkin into manageable pieces. Here’s how I do it:
- Carefully remove a bit a slice from the bottom of the pumpkin. Your goal is to create a flat surface so the pumpkin will not roll around when you are cutting it up.
- Drive the tip of your bread knife right through the pumpkin entering from the top near the stem and going right to the bottom. Once you pass through the skin, the knife will easily glide through the flesh and seed pocket. Bring the knife handle down toward you while holding the pumpkin in place. This will cut half the pumpkin.
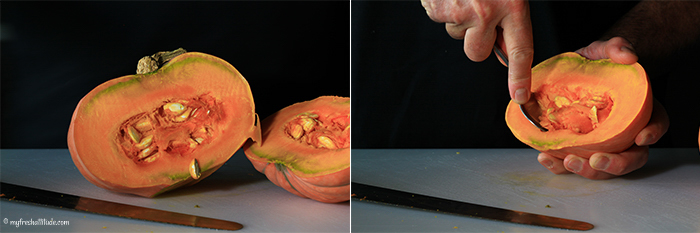
- Turn the pumpkin, and repeat the same move you just made to release the second half.
- Remove the seeds and fibrous material with a spoon. Place one of the pumpkin halves skin side down. Place your knife over the flesh, with one hand on the handle and one hand flat on top of the blade. Push down gently to cut through the pumpkin and create halves. Continue this process to create small pieces of pumpkin.
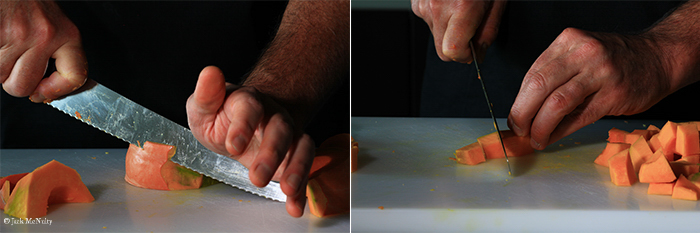
- Remove the peel by placing the pumpkin on the side and carving the skin off in pieces. Cut the flesh into smaller pieces.
Making the Puree
Boiling/Steaming Method: Begin by cutting the pumpkin into 2-cm cubes (about 1-inch). There is no need to be precise about the size – a simple rough chop will do. Place the cubes into a wide pot with a tight-fitting lid. Add a good pinch of salt (and 1-2 tablespoons of sugar if you want a sweet puree). Add 50-100 ml. (1/4- to 1/2-cup) of water, turn the heat to medium-high, cover the pot and set your timer for about 8 minutes (add a bit of water if the pumpkin seems dry at any point during the cooking process). The pumpkin purée is finished when it is easily smashed with a fork. Drain the purée well, making sure to save all the liquid. At this point, blend the cooked pumpkin in a blender or food processor to create a smooth texture.
So, what am I doing with the reserved liquid? Well, there is a lot of flavor in that liquid, and I hate throwing out flavor (taste some…go on, I will wait…delicious, right?). Ok, let’s make it a bit more delicious by placing all the liquid back into the pot and reducing it quickly over high heat – perhaps with 1 tablespoon of maple syrup. Voila – you just made a delicious pumpkin syrup that is fabulous over pancakes!
Roasting: Just like the previous example of steaming the pumpkin, the key to this method is cooking the pumpkin until it is very soft and the juices have concentrated. Begin by cutting the pumpkin in half lengthwise. Remove the seeds and lightly salt the flesh. Place the pumpkin halves in a roasting pan large enough to hold them. Make sure the cut side is facing down (and yes, you can use a baking tray for this job – just line it first with some baking paper). Preheat your oven to 200°C (390°F). Bake the pumpkin for 30-40 minutes, depending on variety and size of the pumpkin. Try to get the pumpkin very soft. You should be able to easily pierce the skin with a dull knife. The timing is difficult, so I recommend testing the pumpkin periodically beginning at the 20-minute mark.
Cool the roasted pumpkin slightly and remove the flesh by scraping it out with a spoon (some flesh is edible and delicious – in this case I tend to leave some in the puree). Puree the pumpkin as before – either with a high-speed blender or food processor.